When we communicated with our customers, we found that most of our customers who don’t have specified pictures had some confusion when designing custom embroidered patches. They don’t know where to start. Today we introduce some of the issues that we need to notice when designing our custom patches. There are seven main points that you need to pay attention to.
Step 1:Choose shapes
When you start to design your custom embroidered patches, you need to decide the shape you need first. You can send us the specified shape you have, or choose the popular shapes. We also have a lot of nice shapes you can choose. The professional designer will answer your questions and solve your problems.
Step 2: Choose sizes
After you decide the shapes, you need to choose a size for your custom embroidered patches. At first, you need to clear your purpose. If you are going to sew it on your clothes, the size should not exceed 3 inches. If it is a logo, the size can be 3 to 5 inches. What’s more, if you use it just as a gift, you can choose the size flexible.
Step 3: Choose colors
After you decide the size, you need to choose colors for your custom made patches. At first, you need to decide the background color. There are nine different colors of your choice. After confirmation of the background color, then you can choose the thread color.
Step 4: Choose the border
There are three main borders for your selection. Merrowed border, Laser cut border and Heat cut border. While the custom patches are shaped into a square, circle, triangle, or rectangle, you can choose a merrowed border. Laser-cut border is good for custom embroidered patches that have an intricate shape. If you want your custom patches to have fine detail and sophisticated design features, you can choose the heat cut border.
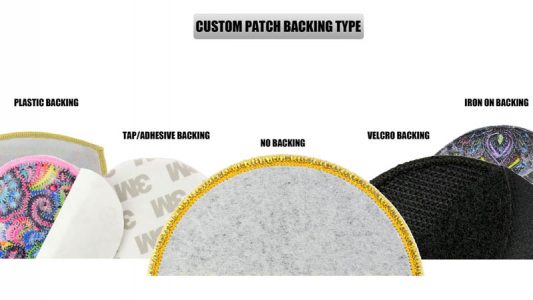
Step 5: Choose the backing
There are 5 backings you can choose, such as plastic backing, tap/adhesive backing, velcro backing, iron-on backing, and no backing. Every type of backing has its own features. You can choose the right backing for you based on your application. Plastic backing adds rigidity and support to the patch, allowing it to keep smooth over time; Tap/adhesive backing is very convenient to use on any clothes; Velcro backing is more durable and flexible. Iron-on backing is very good if you want to sew patches on almost any type of material. No backing is easy to change, it has good flexibility.

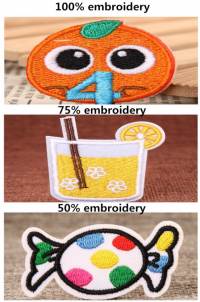
Step 6: Choose types
There are three types of embroidered patches according to embroidery coverage. The three of them are 100% embroidery, 75% embroidery, and 50% embroidery. Every type of embroidery has its advantages. 100% embroidery is an ideal choice if you need to make complicated logos and specified artworks that require a lot of colors. 75% embroidery adds a distinguished look and the permanence of the item for custom made patches. A 50% embroidered patch is suitable for plain text design or ordinary artwork. Different embroidery coverage has an unequal price. The 100% embroidery is expensive. You can choose the embroidery coverage based on your budget.

Step 7: Communicate with designers
After you confirm the six points you want, you need to communicate with the designer carefully. You can tell them your general concept and ask for their suggestions. Of course, you are the people who make the last decision.
There are still many small details that need to notice in the design process. You can leave your comments if you have any confusion. We will answer your problem as soon as possible. Welcome you visit our website: gs-jj.com. You also can email info@gs-jj.com or call 1-888-864-4755 toll-free.
