


How to Make Enamel Pins?
A Step-by-Step Guide about How to Make Enamel Pins?
In history, lapel pins represent authority and rank, satisfying the vanity of people—it is not enough for them to know their importance, and it has greater significance to make others realize their values. Lapel pins used to have a flourishing history during which all industries had their own lapel pins. People liked to use lapel pins to maintain the images of their organizations or to symbolize certain careers. Thus, lapel pins have ushered in a glorious era which we call the“Badges Era”.
How to Make Lapel Pins?
At the present time, the trend of decorative lapel pins has been on the rise, although the authoritative meaning of pins is still applied to government sectors and company groups. Many people collect lapel pins, like pins, and are curious to know more about pins. Then, how to actually produce Custom Lapel pins? Let’s walk into the world of Custom Lapel Pins now.
Beautiful pins demand perfect design drawings. According to the Logo design of pins and the requirements of the clients, practicing designers work out many fine draft designs by drawing black lines on paper. This is the first step of badge molding —design sketching.
Well begun is half done. Next, the confirmed draft designs will be forwarded to the programmers of the factory’s mould department. Pins’ 3D models will gradually emerge on the screen with the tapping of the keyboard. Programmers will look over each part of the 3D models carefully. A little oversight will lead to a waste of future effort, so we must inspect carefully and seriously.


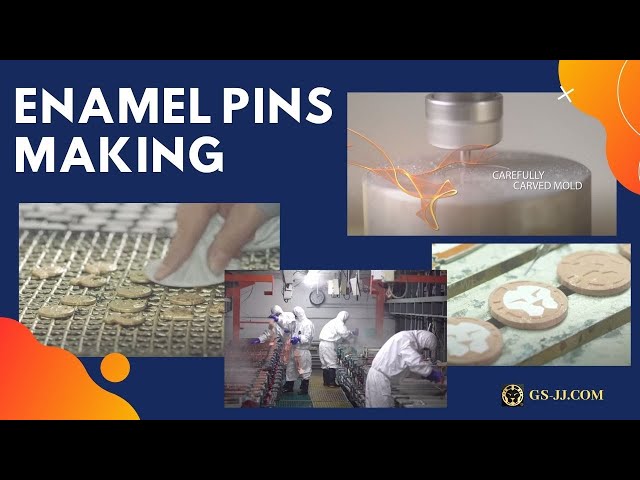
After finishing making 3D models, the production of badges really begins. The first step is engraving. Fixing a pitch-black piece of steel—a kind of material of the mould, on the die milling machine, and then computer programs carve out the badges’ designs on the mould according to the previously compiled 3D models. Next, we use a nicking tool to grind off extra metal little by little, and finally, gradually shape up the designs. This is a slow process. Designs of different sizes or complexities cost different times to engrave. It takes as short as a few hours or as long as a few days to make a mould.
After finishing making the pins mould, our staff needs to carefully compare the newly-made mould designs with the draft designs so as to insure themould designs are correct. Newly-made mould cannot be put into use right away, and we need to bake the mould in a high-temperature oven. This is a simple heat treatment process in which the high temperature decreases the carbon element in the steel and increases the hardness of the mould. A mould will be struck hundreds of times by power up to hundreds of thousands of tons; therefore, the hardness of the mould is of vital importance.
After baking the mould, the next step is immediately dip the mould into the engine oil to cool off the mould in order to further increase the hardness and the tenacity of the mould.
We will cover a steel loop on the outside of the cooled pins mould to prevent the mould from being damaged in the process of stamping. Fixing the mould on thehydraulic machine, and next we can start pressing. This process is what is called DIE STRUCK. The selective materials of pressing include iron, copper, zinc alloy, aluminum, and so on. This time we use iron to make the mould.
The first workblank has come out, and now we need to check carefully whether the design of the workblank is identical to the draft design. We need to modify the mould or even carve a new mould, even with a tiny flaw. If the workblank has no problem after inspection, next we can go into mass production.
Metal blanks have been forming one by one in the roaring sound of the machine. The production speed of the workblank depends on the degree of proficiency of the operation. An experienced old hand is able to produce tens of thousands of workblanks in a day.
After collecting the workblank we have made, next we have to get rid of the extra metal outside the workblank. We need to use a small punching machine in the process. First, we have to make a pin mould ofthe diffusion knife. The method of making a mould of da iffusion knife is almost similar to that of making a mould of a badge, except we don’t have to add a steel loop when doing the former.
We can begin to install the mould of the diffusion knife on the machines now that we have finished making the mould. Workers need to fix each workblank and operate machines to flush out rough blanks one by one, which is a time -consuming and energy- consuming process as well as an indispensable step in the whole production process of lapel pins.
Workers operate skillfully and produce more and more rough blanks of pins. Picking up a rough blank, we can see the basic form of a pin, but we can still see there are many burrs on the rough blank, which might scratch our hands if we pick it up by hand. So the next step we have to do is grinding and shaking.


This bowl-like equipment is the machine for grinding and shaking. When pouring the rough blanks into the machine, the vibration of the machine results in the rough blanks ceaselessly colliding and rubbing with each other. During this process, some small burrs in the edges will be broken and rubbed down. Turning off the machine, we can see the rough blank’s surface has becomesmoother after vibration compared with the previous condition.
There are many specific names for Lapel pins, for example, lapel pins, cufflinks, hat clips, and so on. So what determines the differences in naming? The answer is fittings. Different fittings lead to different usage of badges; thus, there are various names for Lapel pins.
The next procedure we are going to carry out is mounting fittings. Here what we installed are the fittings of extensive use: blood pin and butterfly cap. At present, there are two ways to installa blood pin: one is to stick the blood pin at the back of the product with glue. However, if we take this measure, the blood pin is very likely to fall off with time because the glue loses viscosity. We have chosen the better way, silver soldering, to install the blood pin. In this manner, the tightly welded blood pin becomes so solid that we cannot break it off even with great power, let alone fall off over time.
After mounting fittings, next comes a very important operation: polishing. Polishing is a significant factor in determining the quality of Lapel pins. We believe no one is willing to see that the badges he or she buys are rough around the edges or have a scratched mark on the surface. Therefore, as a company that is highly responsible to clients, our requirements for polishing are very strict. The abrasive wheel used for polishing can be divided into many kinds: there are harder grinding wheels and softer cloth wheels. In a situation where the demand for surface finish and roughness is not high, we can conduct flat polish which means using a grinding wheel to polish products directly. We need to use a cloth wheel to polish for surface finish and mirror gloss. Right now, we use a cloth wheel.
What we are doing now is polishing the polishing of the lapel pins’ surface. Lapel pins will be polished one by one. Polishers carefully control how lapel pins touch the cloth wheel to make sure the polished surface is ground down precisely. The cloth wheel itself is soft, so the high-speed rotating cloth wheel can contact the Lapel pins’ surface to the fullest. It provides a better polishing quality as well as reducing the damage of badges to a minimum. We are going to do side polishing after finishing front polishing. Badges are still polished one by one, which is an inefficient way, yet it brings noticeable results. Soft fire makes sweet malt. Pure handmade is always a synonym for high quality.


Great oaks from little acorns grow. A good foundation means the beginning of success. It is the same with lapel pin making. Badges grow out of nothing from the procedures of die milling, pressing, grinding, shaking, and polishing. Is there any sense of achievement after witnessing a lapel pin develop from a pitch-black piece of steel to a semi-finished one with its own unique feature?
Next, let’s continue to study the development of Lapel pins.
Polished Lapel pins will be sent to electroplating. As required, Lapel pins will be electroplated as bright gold, bright silver, shining copper, as well as antique gold, antique sliver and antique copper. Each electroplating has its respective characteristic, and our company will plate differenttypes of electroplating based on clients’ demands.
Here we are going to do the gold plating. We use copper wires to string together the lapel pins one by one and dip them into the processing solution tank. The first step is using ultrasound to remove oil and dirt staining on lapel pins in the previous productive processes. Oil and dirt disassociate from the pins’ surface through the overclocking vibration created by the sound wave. Then we dip the badges into the washing tank and use water to wash away the residual potion.
Then it is time to witness a miracle. Let’s have a look at how to put beautiful clothes on Lapel pins. First, we dip the pins into alkaline copper liquid and plate a layer of copper as the base color. Any badge of high quality will plate a layer of copper because the pins’ surface will have a better degree of brightness and flatness after plating. Picking up the badges after electroplating, we can see that the badges have put on red clothes, which are shiny and beautiful. However, don’t forget that what we need is gold plating, so we have to continue the process.
After plating, we dip the badges into clear water to wash away residual alkaline copper liquid on the surface and dip them into acid copper liquid once more. You heard it right. It is acid copper liquid and is still copper plating. Why? It’s all about quality. Lapel pins will have a better degree of brightness and be more beautiful after being plated twice. Then we again use water to wash away residual liquid and put the pins into the plating tank. What will happen this time? We have to wait for some time. It’s about time. Do you feel surprised after taking out the pins? The Lapel pins actually become shiny silver, yet they are still not antique gold plating. This is the second set of clothes badges I wear. If what we need are silver-plated pins, the process of electroplating ends here. Nonetheless, we need gold lapel pins, so we have to continue the process.


We put the Lapel pins into the plating sink again, and our operators keep swinging the pins. Can we have gold-plated lapel pins this time? We carefully observe the pins through the plating liquid. The color silver is fading, and the color gold is gradually emerging. Finally, this time the pins become gold-plated. Operators take out the beautiful golden lapel pins. These Lapel pins are put on their last piece of clothing here. But this is not the end. After plating gold, Lapel pins need to be washedthoroughly and placed into the oven to bake. This really is the end of electroplating.
After being plated, Lapel pins will be sent tothe coloring department where they will finish their last and most crucial change. The colorful world gives people an opportunity to appreciate the beauty of color, and this love for color has also extended to the Lapel pins industry. Now we are going to paint color to badges with a color called coloring baking finish. Workers will mix the color we need based on the color alta and draft designs. What a riot of color there is in the workshop for mixing color, and how much it resembles the studio for artists. Coloring badges is like drawing pictures, in which they both create splendid things.
Mixed colors will be sent tothe coloring department, where workers suck color into the needle and start coloring. Coloring is a meticulous work because many places that need to be painted are so small that we have to use needle-a small tool, to fill the color. Small needlepoint bounces off the Lapel pins and fills the color of the lapel pins. In this way, Lapel pins gradually develop and take shape. Quality control inspectors will check the color of badges carefully after coloring. This time, they are still of great quality and have no problem at all.
Lapel pins will be placed into oven after coloring. High temperature baking solidifies and fixes the color ofthe baking finish on the Lapel pins. Fire is the test of gold. Similarly, badges have entered a stage of change and rebirth in the last period.
Badges will undergo quality tests again after baking. Lapel pins that pass the test will be packed individually and will be transported by land or air. They will be delivered to places all around the world from their manufacturing site and play their unique roles in the hands of different people in different countries.
In forming a pin, it goes through dead milling, knifing, polishing, and baking, etc. We continue the traditional manual way to make pins in thisincreasingly automatic era. Each process is protected by the hands of workers and holds every worker’s faith. Cherishing every pin you received, for lapel pins are simple, yet not so simple.


Let's start with GS-JJ: Automated Quotation System for Custom Lapel Pins!