


How to Choose the Right Pin Size: A Complete Guide

Ethan Carter

Pins are also a fashion accessory, and they serve the purpose of branding, awareness, and collecting. Whether it's an enamel pin or a custom lapel pin, people use them to express personality, represent a cause, or display loyalty to an organization. But of all those elements that typically get left out of the way of thinking when designing or even purchasing a pin, pin size is the most important. Pin size plays a huge role in the look, wearability, and functionality of a pin in expressing its message.
This guide explores pin size meaning, the most common sizes, and actual tips for how to make sure that you possess the best size for your use.
I. Why is choosing the right size important?
1. Visibility and impact
The too-small pin goes unnoticed, but a too-large one is uncomfortable or disproportionately large. The correct size is that which makes the pin stand out prominently in just the right way, adding meaning or personality without dominating the clothing or accessory being worn.
2. Design clarity
A pin's detail level is tied directly to its size. Basic forms and minimal designs remain clear at small sizes, but complex patterns, text, or detailed artwork require more space to be readily identifiable. Choosing an appropriate size will maintain the design sharp and recognizable rather than cramped or blurry.
3. Comfort and wearability
Pins tend to be worn for extended periods of time, so wearability should not be neglected. A small pin is light and comfortable to wear on any material, and medium sizes offer a compromise between visibility and wearability. Larger pins can be heavier, and on thin materials, they may even pull or droop, making them more suitable for heavier materials or limited use.
4. Message delivery
Pins are functional and significant. No matter the reason behind awareness, memorials, or advertisements, they must be readable and visually understandable upon first glance. The ideal size ensures that the message is comprehensible and readable in order to render the pin useful and attractive.
II. What are common pin sizes?
Pins are typically in inches in size, based on the longest side of the design. Different sizes suit different applications, and each has its benefits.
1. Small pins (0.75" – 1")
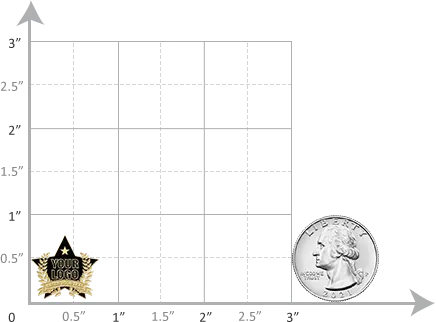
●Suitable for: Delicate highlights, simple icons, or pins to be worn to formal events.
●Advantages: Light, easy to wear for a long time, and complements formal attire.
●Limitations: Not much space for detailing, small lines or text might not be readable.
●Typical uses: Awareness ribbons, business logo pins for uniform wear, and lapel pins for ceremonies.
2. Medium pins (1.25" – 1.5")
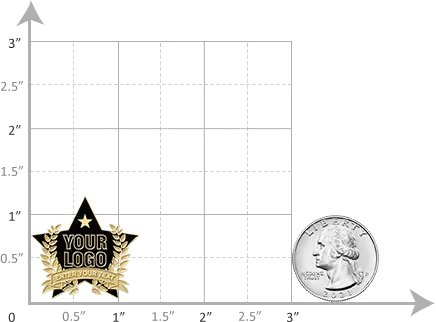
●Best suited to: Designs that balance visibility and functionality.
●Advantages: Large enough to display more detail, but still suitable for everyday wear.
●Disadvantages: Slightly heavier than mini pins, may require stronger backing on lightweight fabric.
●General use: Commemorations of happenings, collector's pin-on pins, and relatively intricate designs such as character drawings or branded logos.
3. Jumbo pins (1.75" – 2" and Up)
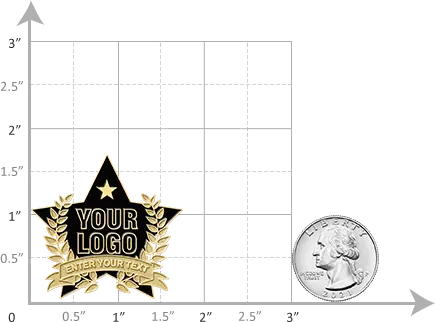
●Best suited for: Statement and detailed artwork meant to be eye-catching.
●Pros: Plenty of room for intricate designs, large color plays, and creative forms.
●Cons: Will be heavier weight, too heavy for delicate apparel, will be bulky for regular wear.
●Standard applications: Anniversary commemorative pins, limited edition artist designs, large collectibles in boards or jackets.
III. Factors to consider in choosing pin width
1. Pin purpose
The purpose of the pin can also determine its ideal size. Tiny pins are appropriate for formal wear, such as uniforms or suits, since they are a decent addition without drawing too much attention. Medium-sized pins are highly sought after for promotion events, marketing, and give-aways, since they are large enough to display logos or messages well. Large pins, on the other hand, are usually chosen on collectibles, commemorative products, or works of art, wherein a focus on creating a bold visual statement is desired.
2. Complexity of design
The second important consideration is the level of detail in the design. Simple logos and basic shapes remain readable at smaller sizes, whereas more color with a profusion of more detailed elements or utilizing lettering occupies more space to be read. A pin that is too small for its design will appear tight or leave out vital details, being less effective as a whole. Choosing the right size involves balancing ambition with practical legibility.
3. Wearing position and placement
Where the pin is to be displayed or worn should determine your size selection. A petite pin appears sophisticated on a lapel or tie, with the look remaining professional and subtle. Medium sizes are general-purpose for hats, lanyards, and uniforms, with visibility without over-accessorizing the appearance. Extra-large pins are more suitable for jackets, backpacks, or display boards, where the additional room lets the pin be a focal point.
4. Practicality and comfort
Comfort is a determining factor, particularly for pins being worn constantly or for extended periods of time. Thicker pins are heavier and more apt to pull on light fabric, so they are unacceptable for light garments. Tiny pins are less apparent and weigh less without realizing it, but they might not offer the visibility that certain designs demand. Taking wearer comfort and usability of the purpose for which the pin is to be worn into consideration ensures that the end result is both handsome and functional.
IV. How to measure pin size?
The pin size is defined by the longest side of the design—either height or width. This is the number manufacturers use when they are producing and quoting.
Step-by-Step Guide to Measurement:
1. Print the artwork or sample
Put the design on paper or display it on screen at 100% size.
2. Measure the longest side
From top to bottom or side to side, whichever is longer.
3. Use inches in recording
Pin sizes are almost always specified in inches (though some suppliers also provide millimeter equivalents).
Accuracy Tips and Beyond:
●Consider shape: Non-standard or irregular-shaped pins are still measured by their longest tip, even if much of the space is smaller.
●Test back compatibility: Larger pins can take two clutches or an engaging back to stay in place.
●Test for the weight of fabric: Experiment with different sizes against thick jackets versus thin shirts since proportions will feel very different.
●Please contact the supplier: Most suppliers give computer mockups or physical proof samples so you can check sizing before production.
V. Tips for making the right choice
1. Measure the design and simulate wearing results
Print your design at different sizes (small, medium, large) and test how it looks on the intended surface—jacket, hat, or display board. This step prevents surprises after production.
2. Communicate with the supplier for samples or sizing recommendations
Professional lapel pin manufacturers often provide sample sizing charts or test pieces. Ask for recommendations based on your design. For bulk orders, samples are worth the extra time to avoid mistakes.
3. Consider the weight and safety of the finished product
Larger pins weigh more, which may require double clutches or locking backs to prevent damage to clothing.
For pins meant for children or active use, smaller and lighter designs are safer.
If pins will be traded or mailed, factor in shipping weight and packaging.
VI. Conclusion
Choosing the right size of pin is not really a personal preference—it's a question of balance. The right size of pin enhances the design, enhances comfort, and gets your message across.
By considering purpose, design details, placement, and practicality, you’ll find the size that works best. And if in doubt, test your design at different sizes and consult with suppliers before production.
A thoughtful choice ensures your custom pins is not only lovely, but also wearable, durable, and strong—whether pinned to a lapel, displayed in a case, or offered as a keepsake.
How are enamel pins made?
Enamel pins are not just for pinboard lovers anymore. Who doesn’t want to be a pin-collector, creating a personal pin board to display their growing collection, or a company sending out marketing material as pins? Enamel pins are now a form of miniature art, a statement of identity, a creative outlet, and a membership card all rolled into one.
Behind every sparkly pin lies a highly accurate manufacturing process that blends new technology with old skills. But if you’ve ever wondered how those cute little designs end up so small, this tutorial takes you through the entire enamel pin-making process from idea to finished pin and explains why you shouldn’t try making enamel pins at home.
15 Creative Ways to Use Enamel Pins
What began as whimsical decorative pins has transformed into objects for self-expression, branding, and creative illustration. With their small size, variety of styles, and durability, they are utilized in fashion, marketing, and daily life in abundance.
Enamel pins are used for more than collecting - they can enhance your personal style, communicate identity, and be used as promotional pins! So here it is: 15 creative and practical uses for enamel pins to inspire you to get the most out of these small and utilitarian little things

Custom Pins Guide: How to Make Enamel Pins Online
What are Enamel Pins? An enamel pin is a type of pin made by carving grooves into the metal surface and then filling it with different colored enamel pigments. Finally, it is baked at high temperatures to create a brightly colored, wear-resistant, and fade-resistant surface.
Enamel pins are divided into two types: soft enamel and hard enamel. The most fundamental difference between the two types of pins is the surface of the pin. The surface of soft enamel is uneven and has a sense of lines, while the surface of hard enamel is the opposite and has a flat surface.