


How to Install Neon Signs

Lea Alber
In recent years, neon signs have become more popular than ever, associated with brilliant, colorful, aesthetic possibilities, and light that enhances the ambiance of a space. Neon provides an aesthetic lighting experience in home décor, in branding for a business, as a backdrop to a special event, and in personal décor and expression.
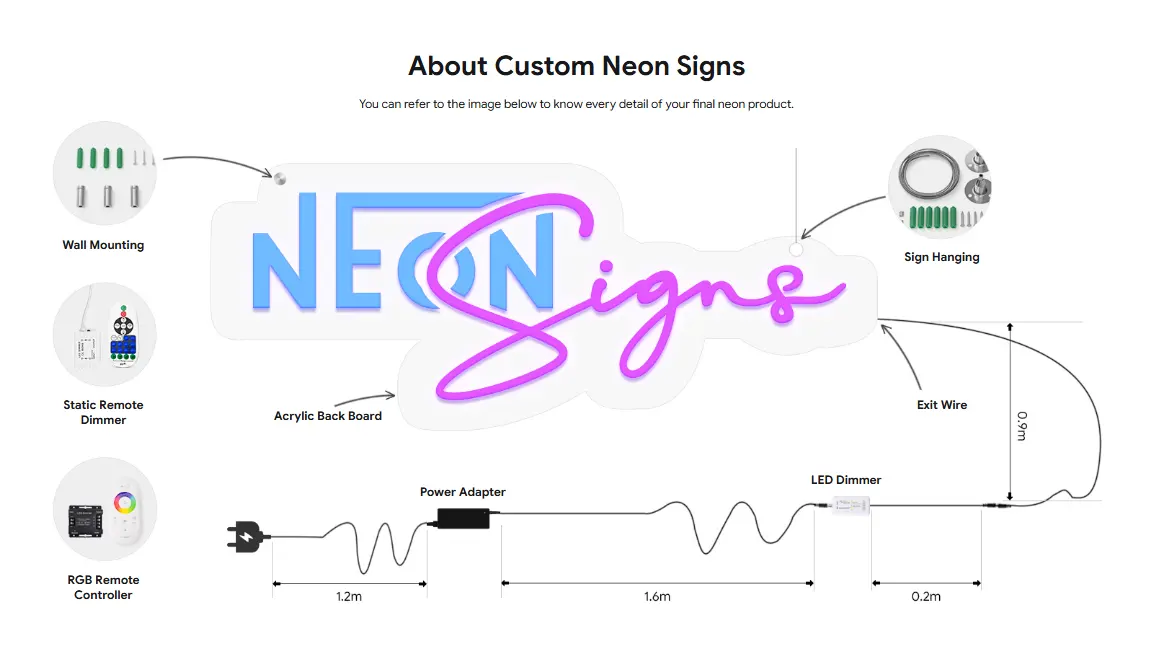
Because neon is typically hanging from a wall, sitting above furniture, or otherwise located in busy areas of traffic from the public or consumers, proper installation is a factor to contemplate. A good installation will keep the sign secure and even while lit, while also not over-stretching the power supply, cord, or wiring. Good installation is also an important safety feature when preventing the sign from being securely mounted, overheating, or causing damage to the cord.
I. What tools are needed to install neon signs?
In order to effectively install neon signs, you will need a selection of tools. The following items will be used in your neon sign installation:
Basic Tools
● Electric drill – to drill holes into walls or other surfaces to install the neon sign.
● Screws and expansion bolts – to secure the neon sign, particularly with walls and ceilings.
● Tape measure – to ensure proper placement and accurate spacing between lights.
● Level – to ensure the neon sign is horizontal and straight.
● Pencil – to mark positions on the surface before drilling.
Safety Gear
● Gloves – to prevent cuts from sharp edges, or shock from electrical components
● Safety goggles – to prevent dust and debris from damaging your eyesight when drilling the sign or handling the sign.
Installation Accessories Provided with Neon Signs:
Typically, the neon signs will include some brackets, hooks, or clips for your particular sign.
Optional Accessories:
● Tape – to temporarily hold the light in position, or to mark accurate positions.
● Chain – for hanging signs from ceilings or over doors.
II. What are the pre-installation preparations for neon signs?
Sufficient preparation guarantees safety, functionality, and attractiveness before you set a neon sign.
1. Choose the installation location
Outside or inside: if it is outside, it will be better to be made out of outdoor-appropriate material and sealed for moisture protection.
Power source: Be sure there is a nearby plug or at least a prepped plug-in in like an extension cord.
2. Measure and plan ahead
Distance: A height that is suitable for the sign will make it look better, thus choose a height that will be the same for your sign.
Mark the holes: Before you use screws or anchors, a level and a pencil will help you to pre-mark your spot.
3. Inspect the neon signs
Look for damage: fungus, broken tubes, chips, loose paneling, etc.
Be sure to plug in the neon sign and see if it lights up nicely.
III. What are the installation methods for neon signs?
Method 1: Screw Wall Mount
1. Identify and label the points of mounting - With the help of a pencil, make small marks at the exact locations of either the screws or the expansion bolts.
2. Drill holes in the wall and fit the expansion bolts - Create holes of the proper size according to the wall type and put the expansion bolts in to make the neon light securely attached.
3. Position and secure the neon sign - Place the neon light on the expansion bolts and tighten it up with the screws.
Method 2: Chain or Rope Suspension
This method is the perfect way to display neon signs on ceilings or walls that need special attention:
1. Hook Installation - Make sure that the hooks are fitted on the wall correctly at the indicated spots, and they can bear the weight of the lighted sign.
2. Joining the Chain or Rope - A heavy-duty chain or rope is required to connect the neon sign to the hooks.
3. Control Height and Stability - Check that the neon sign is vertical and secure; if necessary, alter the length of the chain or rope.
4. Power Connection and Testing - Turn the neon sign on and see if it works as it should.
Method 3: Using Adhesive Tape
This technique is suitable for ephemeral constructions or non-heavy neon signs:
1. Remove any dirt from the wall - The wall should be clean, dry, and free of any dirt, dust, oil or other particles.
2. Apply strong adhesive tape - Stick power double-sided tape or installation tape on the rear side of the neon light.
3. Take up panel with pressure - Neon light is to be pressed onto the wall very securely ensuring that it is completely and very firmly stuck.
4. Before powering up check - Check that the neon light is secure and won't fall down, then plug in and test the light.
IV. Electrical and Safety Precautions
Electric and safety measures neglected in the use of neon lights can cause the lights to burn out or even their destruction:
1. Verify that the voltages match—To rule out electric shock, compare the neon sign's voltage with the voltage of the power supply.
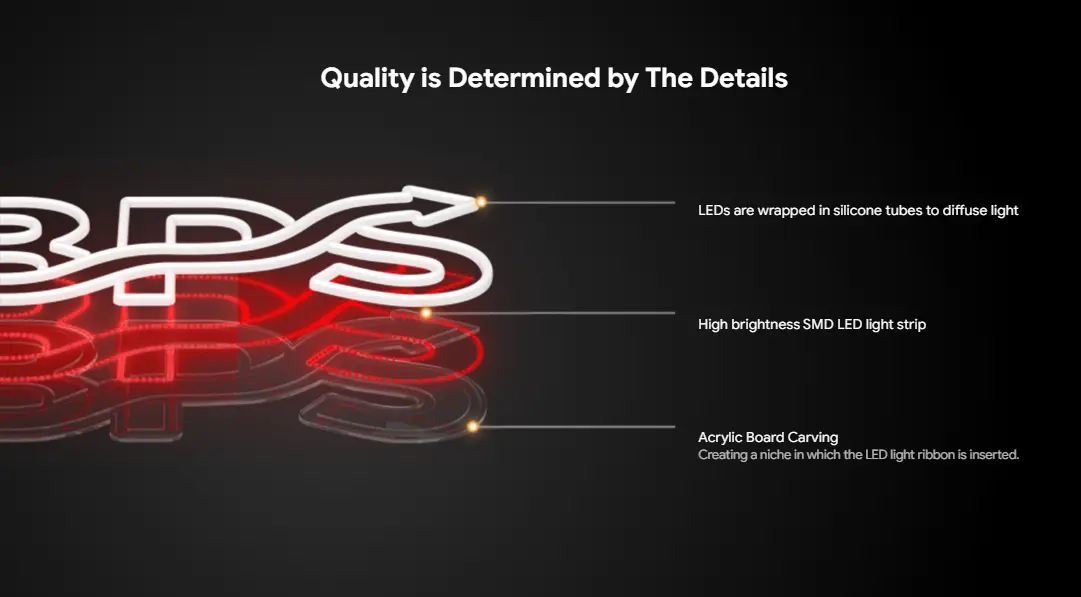
2. Do not excessively bend the LED neon tubes—Over-bending the tubes will either break or reduce their life span.
3. Water should be kept at a distance—Neon signs are electrical devices; do not place indoors or outdoors near water sources where the environment is moist unless the neon sign is specifically indicated for such wet/outdoor environments.
4. Cable management for aesthetics—Secure the cables with clips in a way that they are not only safe but also visually appealing.
V. Conclusion
Neon sign installation done correctly will be met with safety and damage as well as with the lightest visual effect they can give.
There is no better way to go about it than through proper preparation of the installation area, the use of proper mounting techniques, and the strict adherence to electrical and safety precautions. The result will be a display that is not only full and secure but also durable and capable of giving an extra touch to any place.

How to Choose the Ideal Neon Sign Size?
A neon sign is described as "a bright sign composed of either flexible LED neon or traditional glass neon tubes that gives off a bright glow." Most neon signs used to consist of glass tubes filled with neon gas, but now most neon signs will have LED equivalents that are more energy efficient, safer, lighter, and less brittle.

The Comprehensive Guide to Choose Neon Sign Suppliers
Neon signs were regarded as retro decor, but they have now become not only a necessity in modern homes but also in modern businesses. Their lights shining and colors tinting made them recognizable and, thus, a real visual. If custom neon signs are on your list, then you have to be very selective in picking a partner.

How to Clean Neon Signs?
Neon signs, as a decorative feature, have entered our lives in so many ways that, regardless of their purpose, whether they entice someone to a business, decorate a home, or provide atmosphere at an event, neon signs are a good item.
Similar to any other decorations, they are likely to accumulate dirt and dust. While the accumulation of dust and dirt may lessen or dull your neon signage, cleaning your neon decorations will allow you to get the most life out of them. How, then, should a neon sign be cleaned?