


Custom Pins Guide: How to Make Enamel Pins Online?

Lea Alber
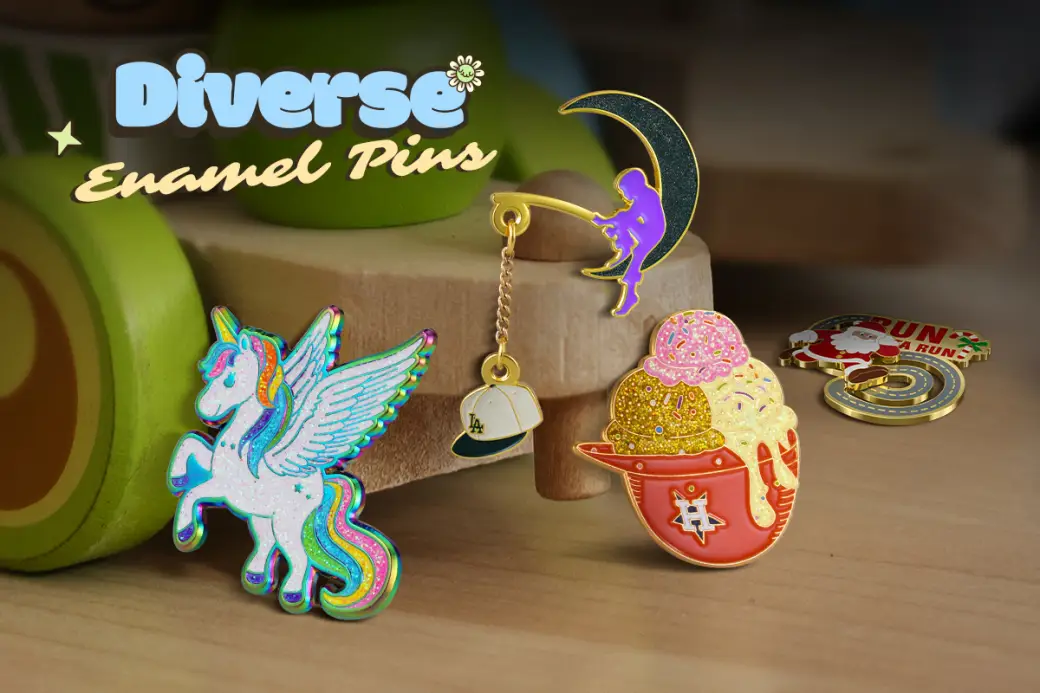
What are Enamel Pins? An enamel pin is a type of pin made by carving grooves into the metal surface and then filling it with different colored enamel pigments. Finally, it is baked at high temperatures to create a brightly colored, wear-resistant, and fade-resistant surface.
Enamel pins are divided into two types: soft enamel and hard enamel. The most fundamental difference between the two types of pins is the surface of the pin. The surface of soft enamel is uneven and has a sense of lines, while the surface of hard enamel is the opposite and has a flat surface.
I. How to make enamel pins?
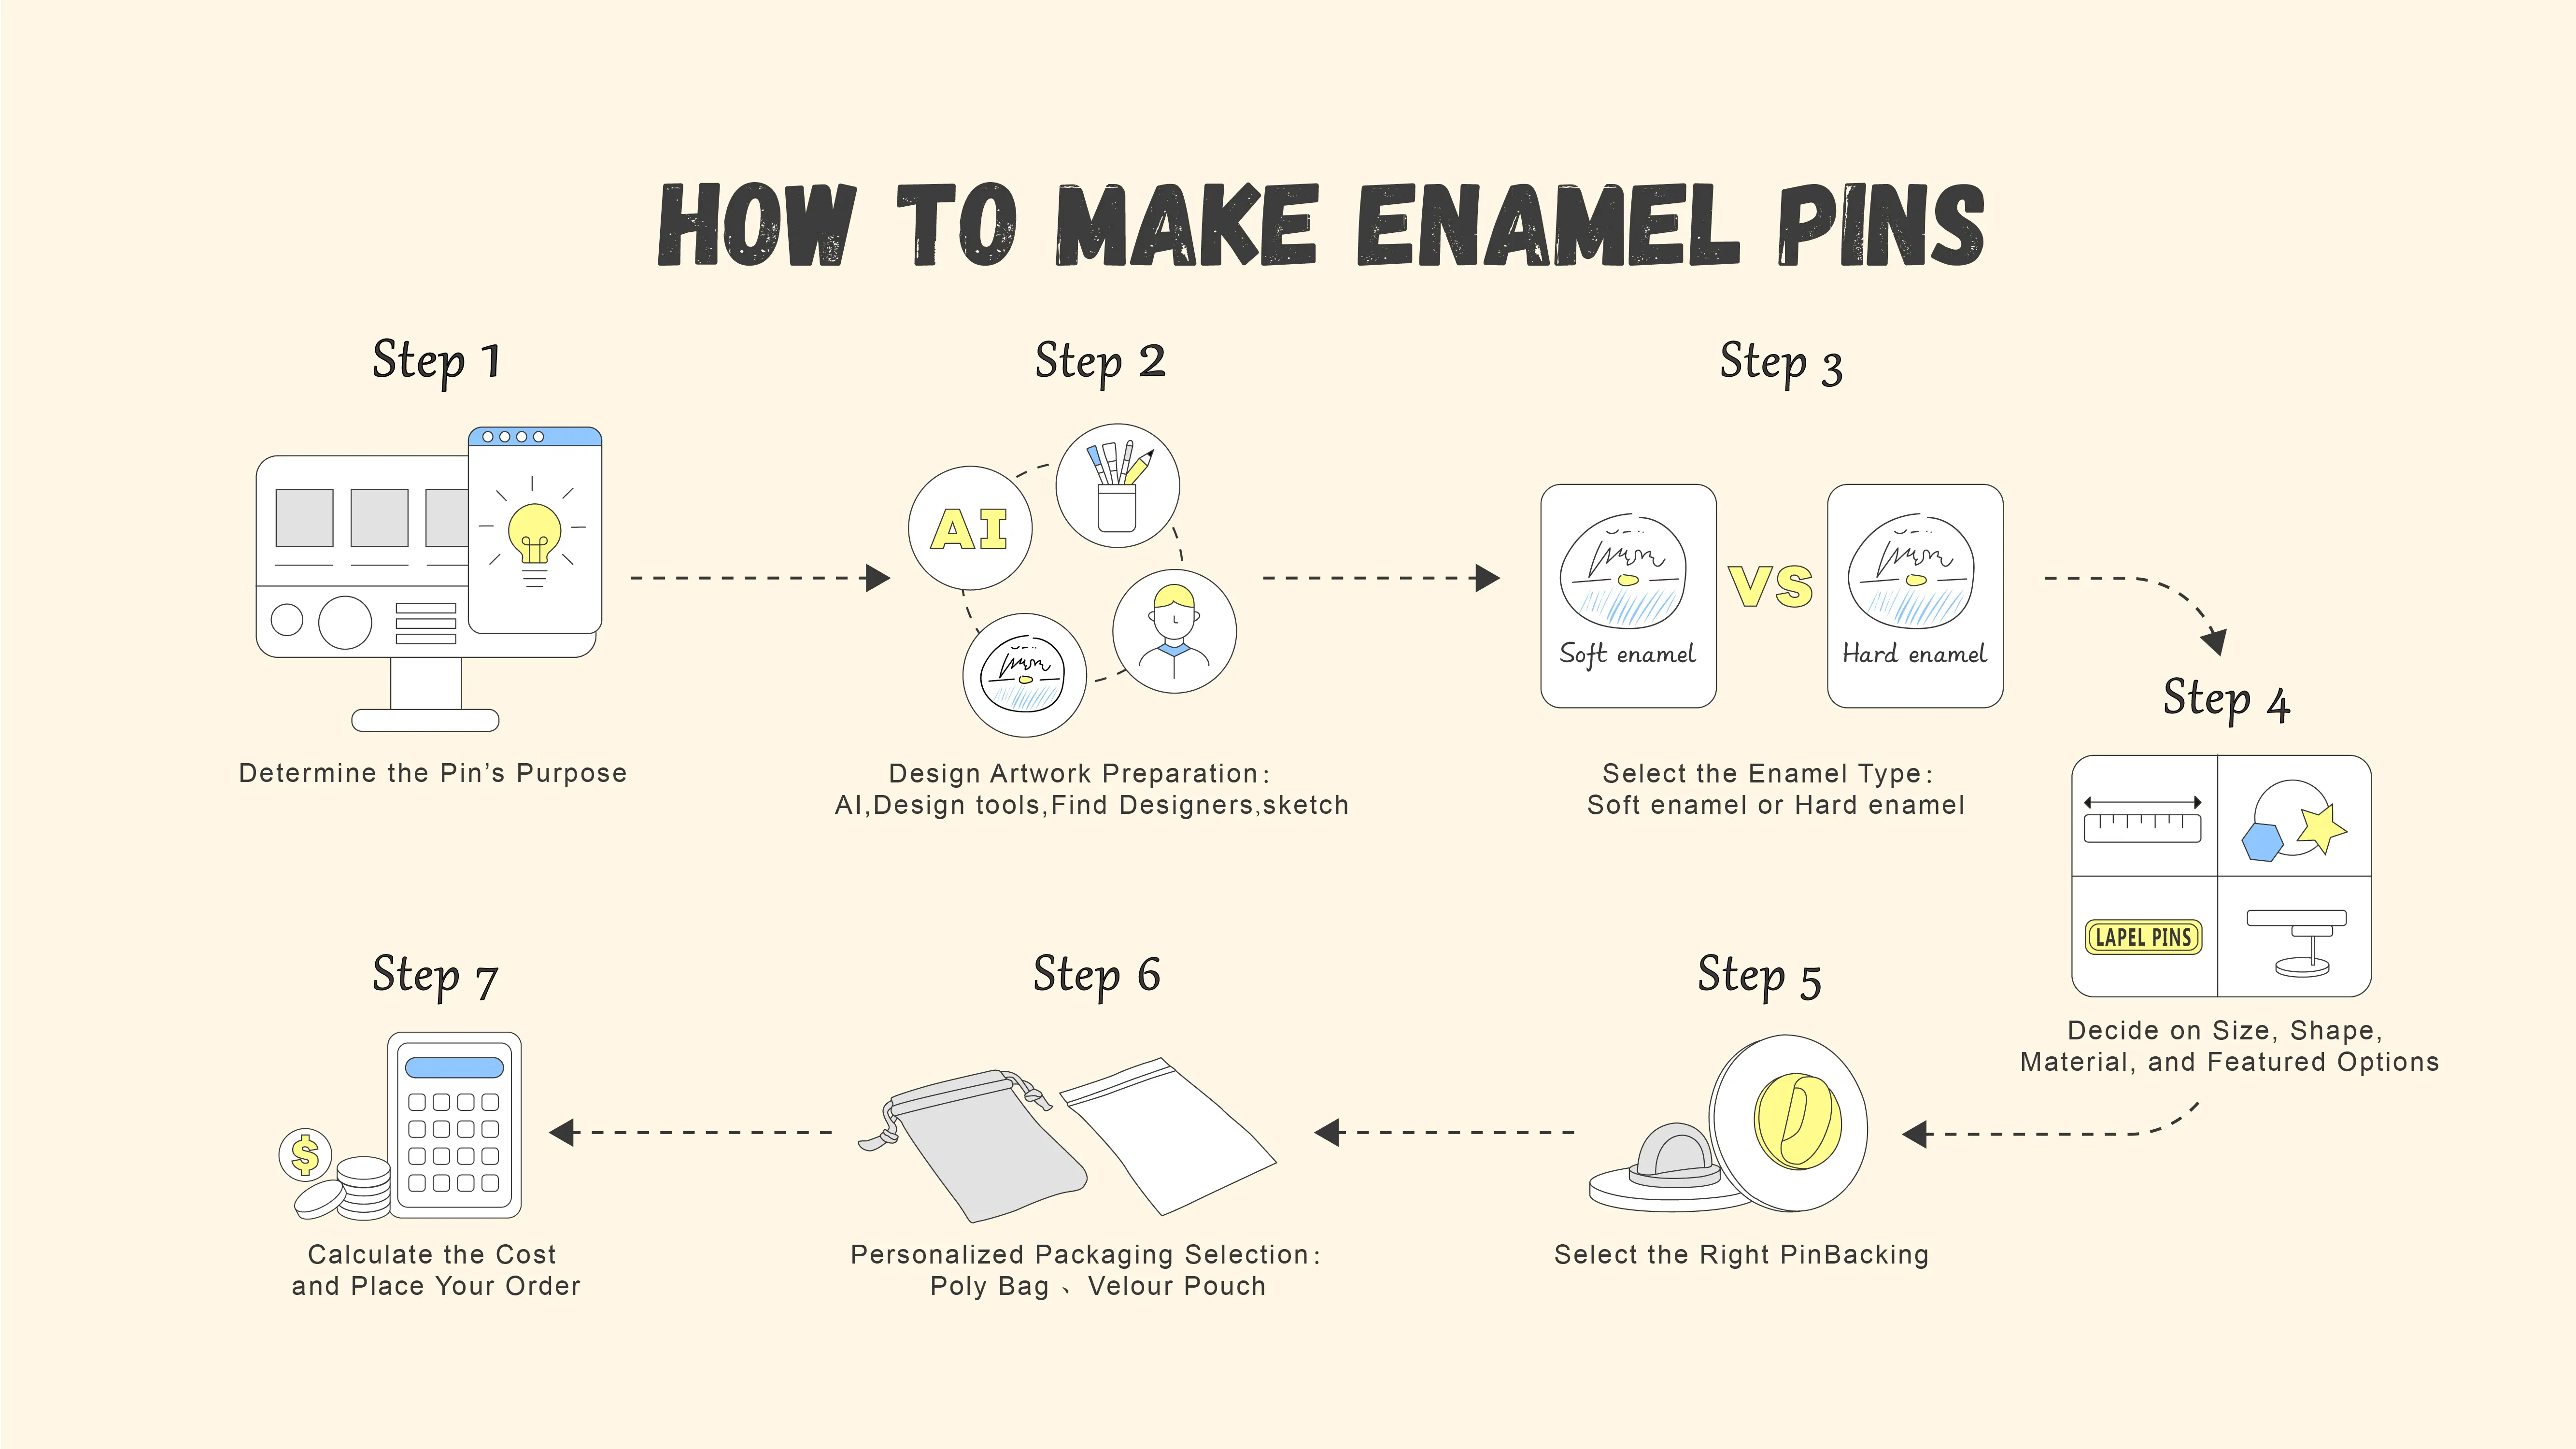
To help you make better custom pins, the following guide is for your reference to help you make the perfect pin.
Step 1- Determine the pin's purpose
Step 2- Design artwork preparation
Step 3- Select the enamel type
Step 4- Decide on Size, Shape, Material, and Featured Options
Step 5- Select the Right Pin Backing
Step 6- Personalized packaging selection
Step 7- Order Check
Step 8- Calculate the Cost and Place Your Order
Step 1- Determine the pin's purpose
The first step in pin customization is to clearly define its purpose—the person, context, and meaning.
Pins have numerous usage scenarios, but they can be categorized into functional and emotional/decorative.
Use scenarios for functional pins:
● School and club pins: Used to identify grade, class, or club.
● Military pins: Used to indicate military status and authority.
● Exhibition pins: Used to indicate status and employee identity.
● Non-profit organization pins: Used to indicate identity and attributes.
Use scenarios for emotional/decorative pins:
● Anniversary pins: Used to commemorate important moments.
● Fan pins: Used to express personal support and affection.
● Artist pins: Used to express appreciation for an artistic style.
● Travel pins: souvenir pins.
The purpose of the pin will affect its design, so after confirming the theme of the pin, the design of the pin will come into play. Here are some other key factors to consider.
1. Different functional requirements influence design elements.
● Identification pins: Ensure clear text and logos, and avoid excessive patterns.
● Decorative pins: Emphasize pattern and color, emphasizing personalization.
2. Frequency of use: Influences type selection.
● Long-term wear: Hard enamel brooches with a smooth surface are generally chosen; polished brooches are more wear-resistant.
● Short-term wear: Soft enamel brooches are generally chosen for their vibrant colors and lower cost.
3. Environmental requirements influence material selection.
● Outdoor pins: Choose waterproof and fade-resistant electroplated pins.
Step 2- Design artwork preparation
The second step in making a pin is to design the pin artwork, which is mainly divided into two types: self-design/design with the help of a designer.
The #1 Method: Independent design - suitable for people who have ideas and creativity and can operate design software, but it has a certain degree of difficulty.
1. Collect and prepare design elements: Confirm the emblem's design elements, colors, and composition.
- Confirm the emblem's design elements, composition, and overall visual balance.
- Specify Pantone (PMS) Colors: Physical pin manufacturing uses the Pantone Solid Coated matching system for enamel filling. Always map your colors to exact Pantone numbers (e.g., PMS 186 C) rather than RGB or CMYK, as screen colors will shift during production.
- Mind color limits & gradients: Enamel pins require solid color blocks separated by raised metal line walls. Avoid subtle color gradients or soft shadows unless you plan to use offset print pins with an epoxy dome. Standard base pricing usually covers 4 to 5 colors; adding extra colors may incur added fees.
2. Select design tools:
- Professional design tools: Adobe Illustrator, Sketch, CorelDRAW, etc.
- Entry-level design tools: Canva, Figma, etc.
- Online design tools provided by pin manufacturers, such as GS-JJ and Pin People, often offer a large number of free design templates.
- AI software: After absorbing a design idea, AI software can quickly generate an image and allow for multiple modifications and additions. While easy to use, it may require manual adjustments to achieve a satisfactory image.
3. File formats & factory requirements:
- Vector formats (AI, EPS, PDF): Highly recommended. Vector files preserve line clarity and precise Pantone color channels, preventing distortion when scaled.
- Raster formats (JPG, JPEG, PNG, GIF, BMP, TIF): Accepted by most manufacturers, but high resolution (300+ DPI) is required so factory artists can vectorize the artwork correctly.
The #2 Method: Designer Helper Design---suitable for those who are short on time, need professional design, or lack design experience.
Using a designer can save time and effort, and most pin suppliers offer free design services.
In just three steps, you can quickly complete a design while avoiding many design errors.
- Provide design ideas: Share reference images, sketches, and exact Pantone color codes (or brand style guides) if you have mandatory corporate colors.
- Receive artwork proof: Review the digital proof supplied by the manufacturer, making sure every enamel area displays the correct Pantone code callout and metal plating line.
- Confirm design: Double-check color accuracy, spelling, and line separations before approving mass production.In addition, you can find a designer you like through design platforms and freelance websites and commission them to design a pin for you.
For a more detailed guide on pin design, you can check out: How To Design Custom Pins for Beginners?
Step 3- Select the enamel type
1. What are some popular types of pins?
There are 2 main types of enamel pins—soft enamel and hard enamel. This is a type that many people tend to confuse, but the following comparison will help you make a better choice.
| Contents | Soft Enamel Pins | Hard Enamel Pins |
| Process characteristics | Concave and convex | Smooth surface |
| Durability | Prone to wear and fading | Strong wear resistance |
| color | Brighter colors | Softer colors |
| cost | Relatively low cost | Higher costs |
| Applicable Scenarios |
Limited budget, mass production |
Pursuit of quality and texture |
| Thickness and weight | thin and lightweight |
thicker heavier texture |
| Typical uses | Event commemorative pins, promotional pins, employee pins | High-end commemorative pins, honor pins, and military pins |
2. Which Custom Enamel Pins Are Best for Tiny Text or Small Details?
Traditional enamel pins are often prone to one big problem: bleeding. That's because paint needs those raised metal walls to stay separated. So if your design's got small text, tight detail work, or a lot of colors close together, you need to think carefully about which process you pick.
To keep your text legible and your fine lines crisp, you have to match your graphic layout to the right production process.
Custom Printed Pins Provide a Borderless Solution for Fine Typography
For designs featuring a complex logo or subtle color gradients (or text under 5pt), you can skip metal borders entirely and let printing handle the detail.
- How it's made: High-definition UV ink skips the mold-making process entirely and gets printed directly onto a flat metal surface.
- Will my design look clean? Text stays sharp and readable because there are no physical paint walls to crowd your letters or blur your lines.
Die Struck Pins Use Shading to Keep Monochromatic Details Crisp
If you're creating a design that needs extensive typography or intricate geometric seals, it's better to go with something monochromatic, like a stamped approach, for example.
- How it's made: The machine stamps your graphic directly into thick sheet metal, creating a layered, textured look.
- Will my design look clean? Recessed areas are treated with an antique plating or sandblasting to create deep, contrasting shadows that make tiny text incredibly easy to read.
3D Custom Pins Focus on Sculpted Depth Rather Than Text
Some designs feature highly detailed shapes like human faces and animal mascots. Here, a 2D pin isn't your best bet, since it'll flatten out all that depth.
- How it's made: Molten metal is cast into a dimensional mold, creating a 360-degree pop-out effect on the face of the pin.
- Will my design look clean? This method gives massive physical weight to characters and illustrations, but micro-text does not work well here since casting prioritizes texture and depth over fine typography.
3. Which Custom Enamel Pins Provide the Best Long-Term Color Retention?
How long your pin's color lasts comes down to how the factory cures the paint. Price, meanwhile, depends on the molding work involved. Put the top options side by side, and you'll see a clear trade-off: pay more now, or pay less and get less lifespan.
- Hard enamel pins are the gold standard here. The factory bakes liquid paint into metal cells at high heat, then polishes it flat. That process gives you a smooth, scratch-resistant surface that won't fade or chip for decades. They're a premium option, starting around $0.63 per piece for bulk orders.
- Soft enamel pins are the classic textured look, and they sit at a nicer middle-ground price. The color gets baked but not polished flat, so you're left with raised edges and recessed paint. That means the paint's a bit more exposed to friction, but you can add a clear epoxy dome for extra protection. Prices start around $0.50 per piece.
- UV printed pins are your cheapest option when you want vibrant color on a budget. Since the design is just ink sitting on a flat metal plate, how long it lasts depends entirely on protection. Add a clear epoxy dome, though, and you seal it completely. These start around $0.47 per piece, and you can get them through GS-JJ's 24-hour rush delivery. if you are working against a tight event deadline.
For a more detailed guide on badge manufacturing processes, please check out: Custom Lapel Pin Ordering Guide.
Step 4- Decide on size, shape, material, and featured options
①How to choose the size of my enamel pins?
Pins come in sizes from 0.5 inches to 3 inches, but bigger isn't always better; getting the right size is key.
Common sizes are 1 inch, 1.25 inches, and 1.5 inches, which are suitable for most themed pins.
② How to choose the shape of my enamel pins?
When choosing a shape, consider design, practicality, and cost. Here are some guidelines for reference:
- Design: For complex patterns, irregular shapes are often chosen to directly match the design.
- Practicality: For comfort, small, regular shapes are more stable. Options include round, square, and heart shapes.
- Cost: Irregular, complex shapes are more expensive. For mass production, regular shapes are less expensive.
What Are the Top-Rated Custom Lapel Pin Shapes and Why Do People Choose Them?
● The Geometric Classics
Symmetrical borders are the top choice for corporate branding and event merchandise. Event coordinators like them a lot. They fit text in without making the design look messy or crowded.
- Circles, squares, and rectangles: You see these on logos and trade show giveaways all the time. You can wrap text around a curve or line it up straight across a bar. Either way, it stays centered and prevents gaps in the design.
- Shields, stars, and hearts: These shapes carry immediate meaning before anyone reads the text. Law enforcement and military groups choose shields to project authority. Stars work well for milestone recognition awards, while hearts are the default for healthcare pinning ceremonies and charity fund-raisers.
- Official flags: If you are ordering items for a civic club, political campaign, or international assembly, using specialized shapes like those used for custom flag pins ensures national emblems are framed correctly according to official branding rules.
● Custom Die-Cut Outlines
Forcing a detailed character illustration or a stylized, hand-drawn logo into a standard circle can ruin the artistic vibe. This is why independent creators and merchandise brands skip standard geometric borders entirely.
Instead of working inside a pre-made template, the factory cuts the metal base to match the exact outer edge of your graphic. Choosing options like custom cut-out pins shifts your merchandise into a premium retail tier that gaming and anime fans actively collect.
Trimming away the dead background metal also reduces the weight of the pin. This keeps the finished piece from sagging, drooping, or pulling on delicate suit fabrics, light shirts, and everyday clothing.
● Interactive Layouts
If you want to catch people's attention in a crowded market, you can look beyond flat, static metal designs. Adding physical motion to your pin completely changes how customers connect with your product.
When it comes to specialized kinetic mechanics, they make the final product highly engaging. Our spinning enamel pins show how adding a simple rotating axis or a tiny sliding track turns a standard lapel accessory into a piece of wearable art. These options help the product stand out instantly by giving your buyers a tactile element they will want to play with and show off.
③ How to choose the material for my enamel pins?
Common pin materials include iron, brass, and aluminum alloys. The following factors can be considered when selecting materials.
- Budget: Iron and zinc alloys are suitable for low-budget, large-volume custom pins. Brass is suitable for high-budget, small-volume custom pins.
- Design: Brass is suitable for pins with complex designs.
- Use Environment: For outdoor or long-term wear, it is highly recommended to choose corrosion-resistant materials like aluminum and stainless steel. Additionally, pairing these metals with a hard enamel finish will help the pins resist scratching and maintain their pristine appearance even in harsh conditions.
Iron and brass are used in most enamel pin customizations, taking into account the characteristics of each material. Just considering the above 3 aspects can help you choose the right material.
④ How to choose a special finish for my enamel pins?
To enhance the pin's design, enamel pin manufacturers often offer a variety of special finishes, including the following:
- Luminous: This allows the pin to glow in the dark.
- Pearlescent: This offers a pearlescent, mica-like finish and is a high-end, eco-friendly finish.
- Rhinestone: Custom rhinestones are engraved onto the pin to sparkle in the sun.
- Glitter: This gives the pin a shimmering effect.
- Custom Plating: Choosing high-polish gold, silver, or rose gold plating can create bright metallic effects that beautifully outline your design and make the colors pop.
These techniques can make the appearance, texture, and feel of the pin more unique. If you have a higher budget, choosing these special techniques can help you make a more exquisite pin.
For more detailed information on the full dimensions of the pins, you can check out: "How Do You Pick the Right Size for Your Custom Pins?"
Step 5- Select the right pin backing
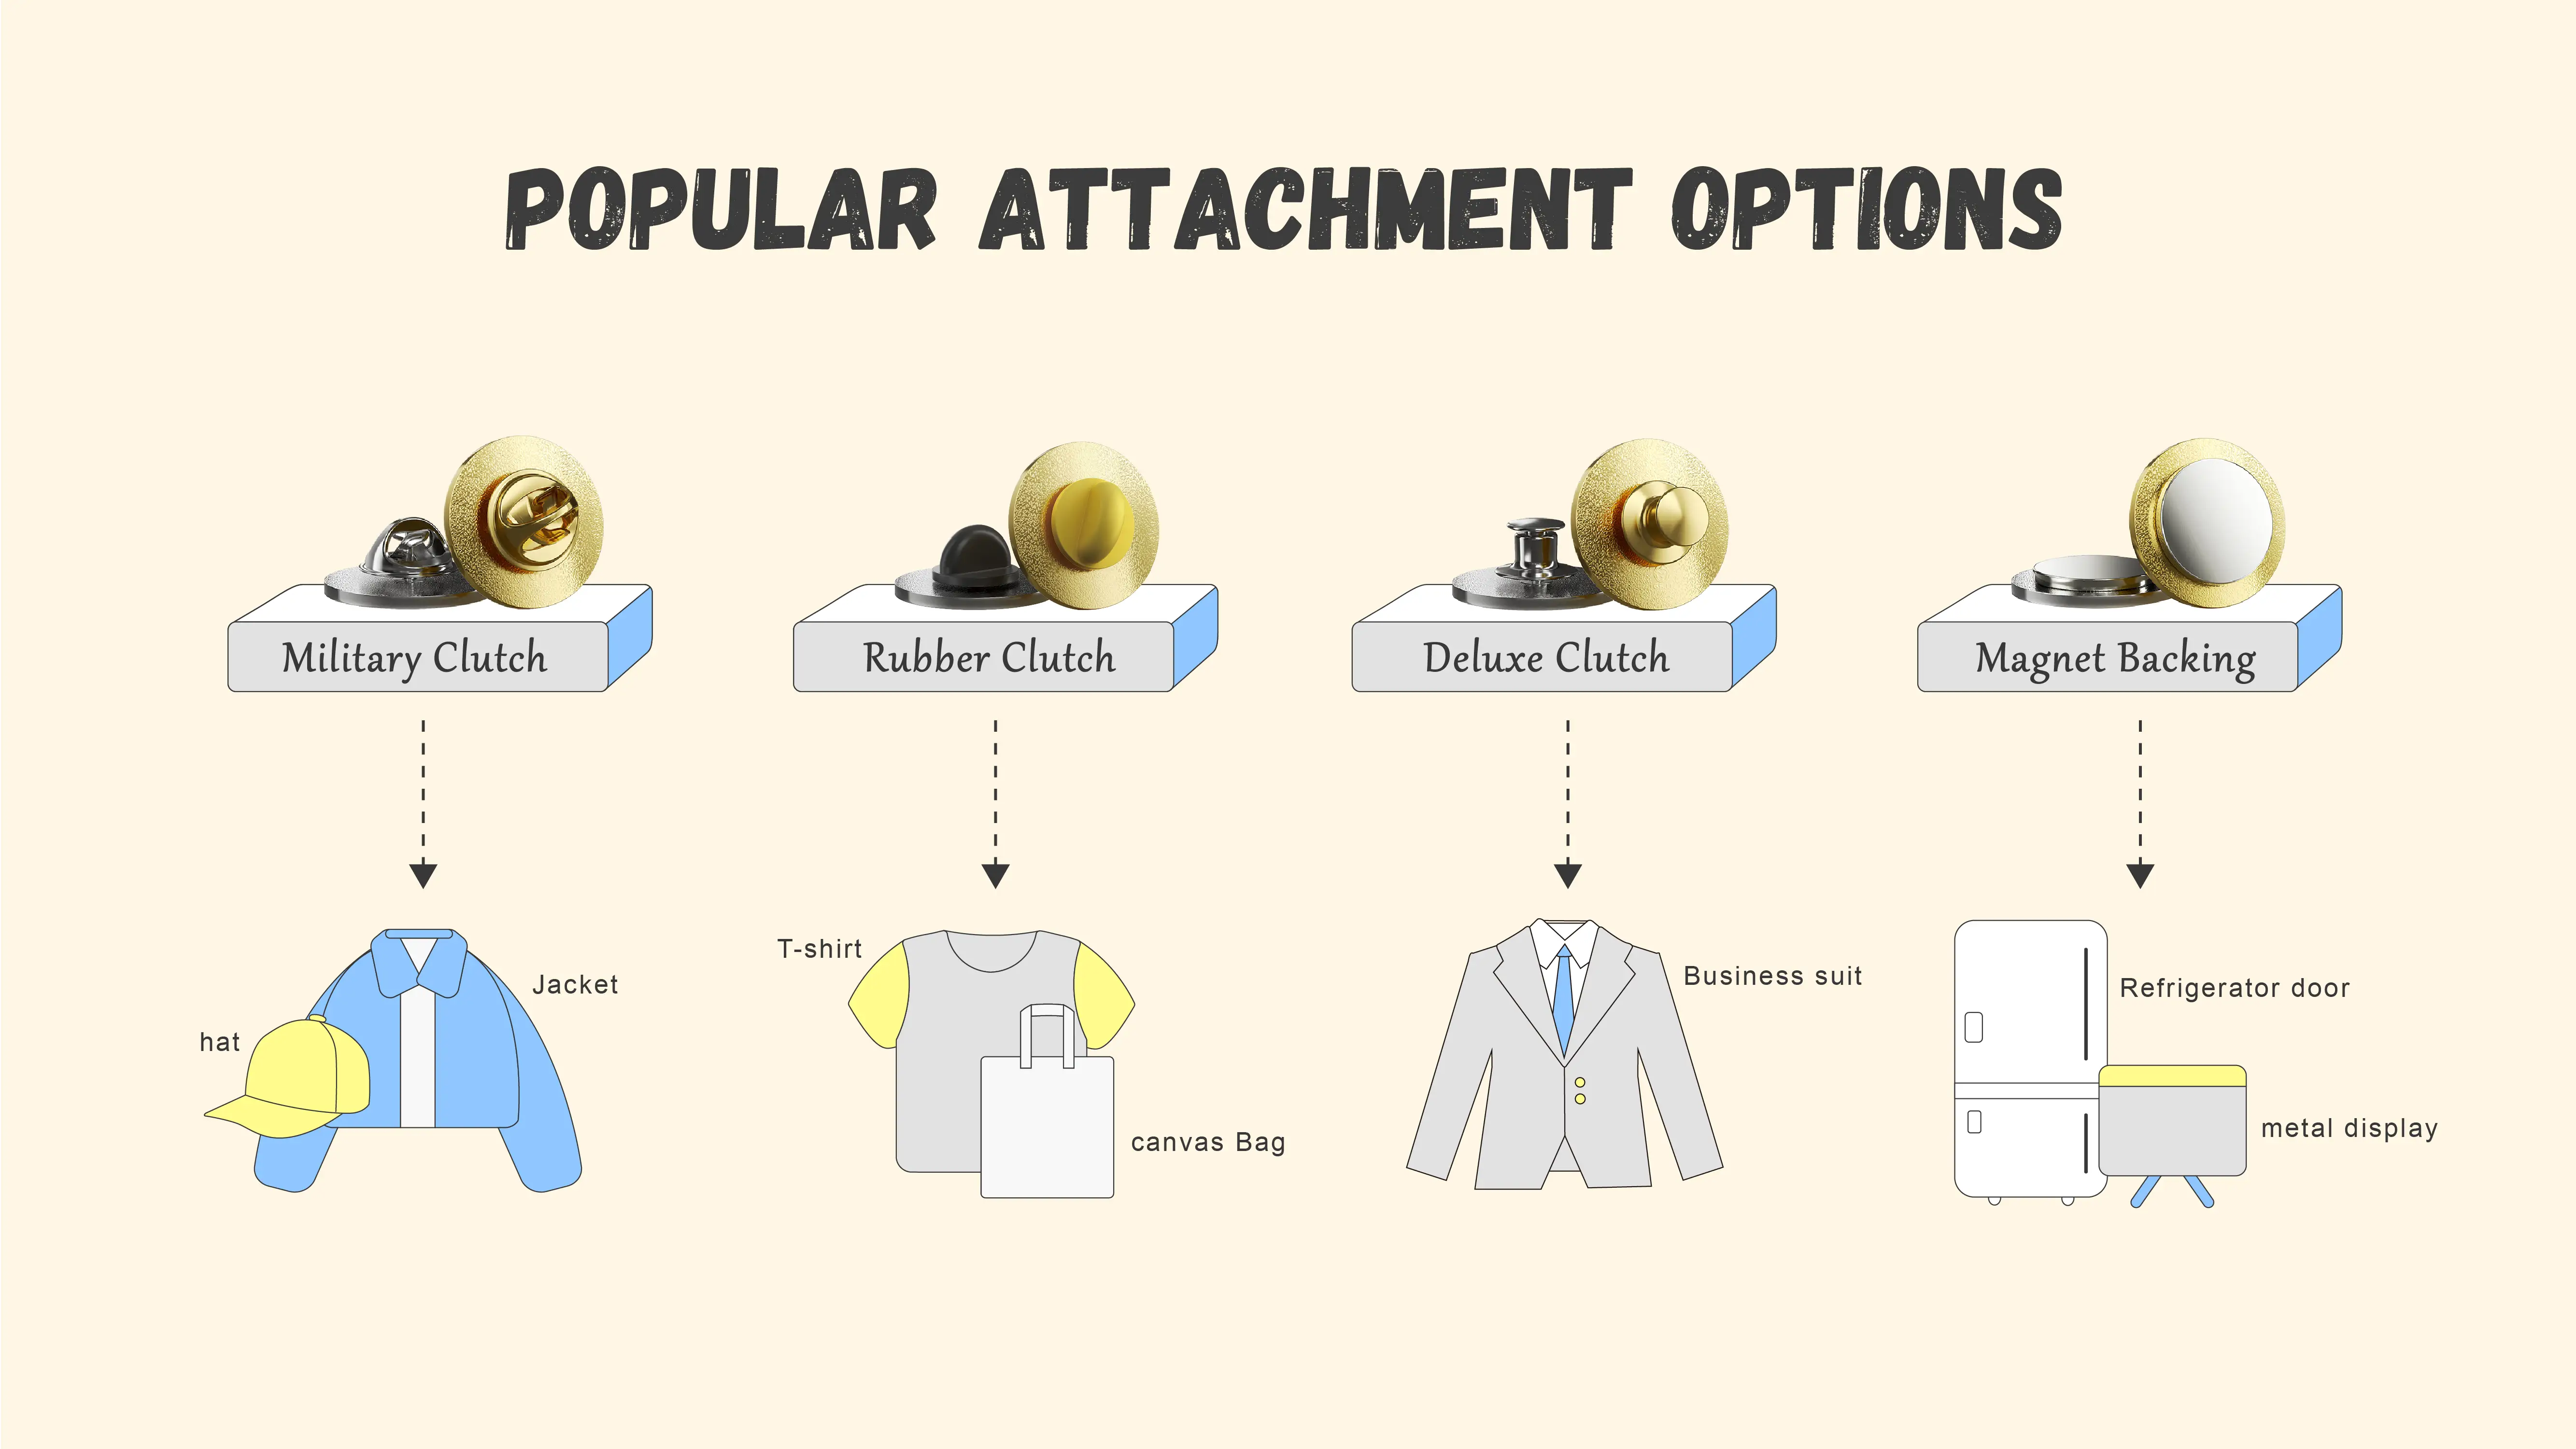
Choosing a backing for a pin depends on where it will be worn. Below are some common backing options and recommended uses.
● Military Clutch: This is the most common, cost-effective, and securely fastened, making it suitable for most common event pins.
● Rubber Clutch: This is comfortable for children and suitable for promotional gifts and children's pins.
● Deluxe Clutch: This is exquisite, but more expensive, making it suitable for high-end custom pins.
● Magnet Backing: This type of backing is gentle on clothing and suitable for formal wear or delicate fabrics.
Based on the backing's characteristics, security, comfort, application scenario, and cost, choosing the right backing will be much easier.
The above backing styles are the most common, but there are also options like two deluxe clasps and two military clasps.
For a more detailed, comprehensive guide to lapel pin backings, you can check out: The Complete Guide to Custom Lapel Pin Backs.
Step 6- Personalized packaging selection
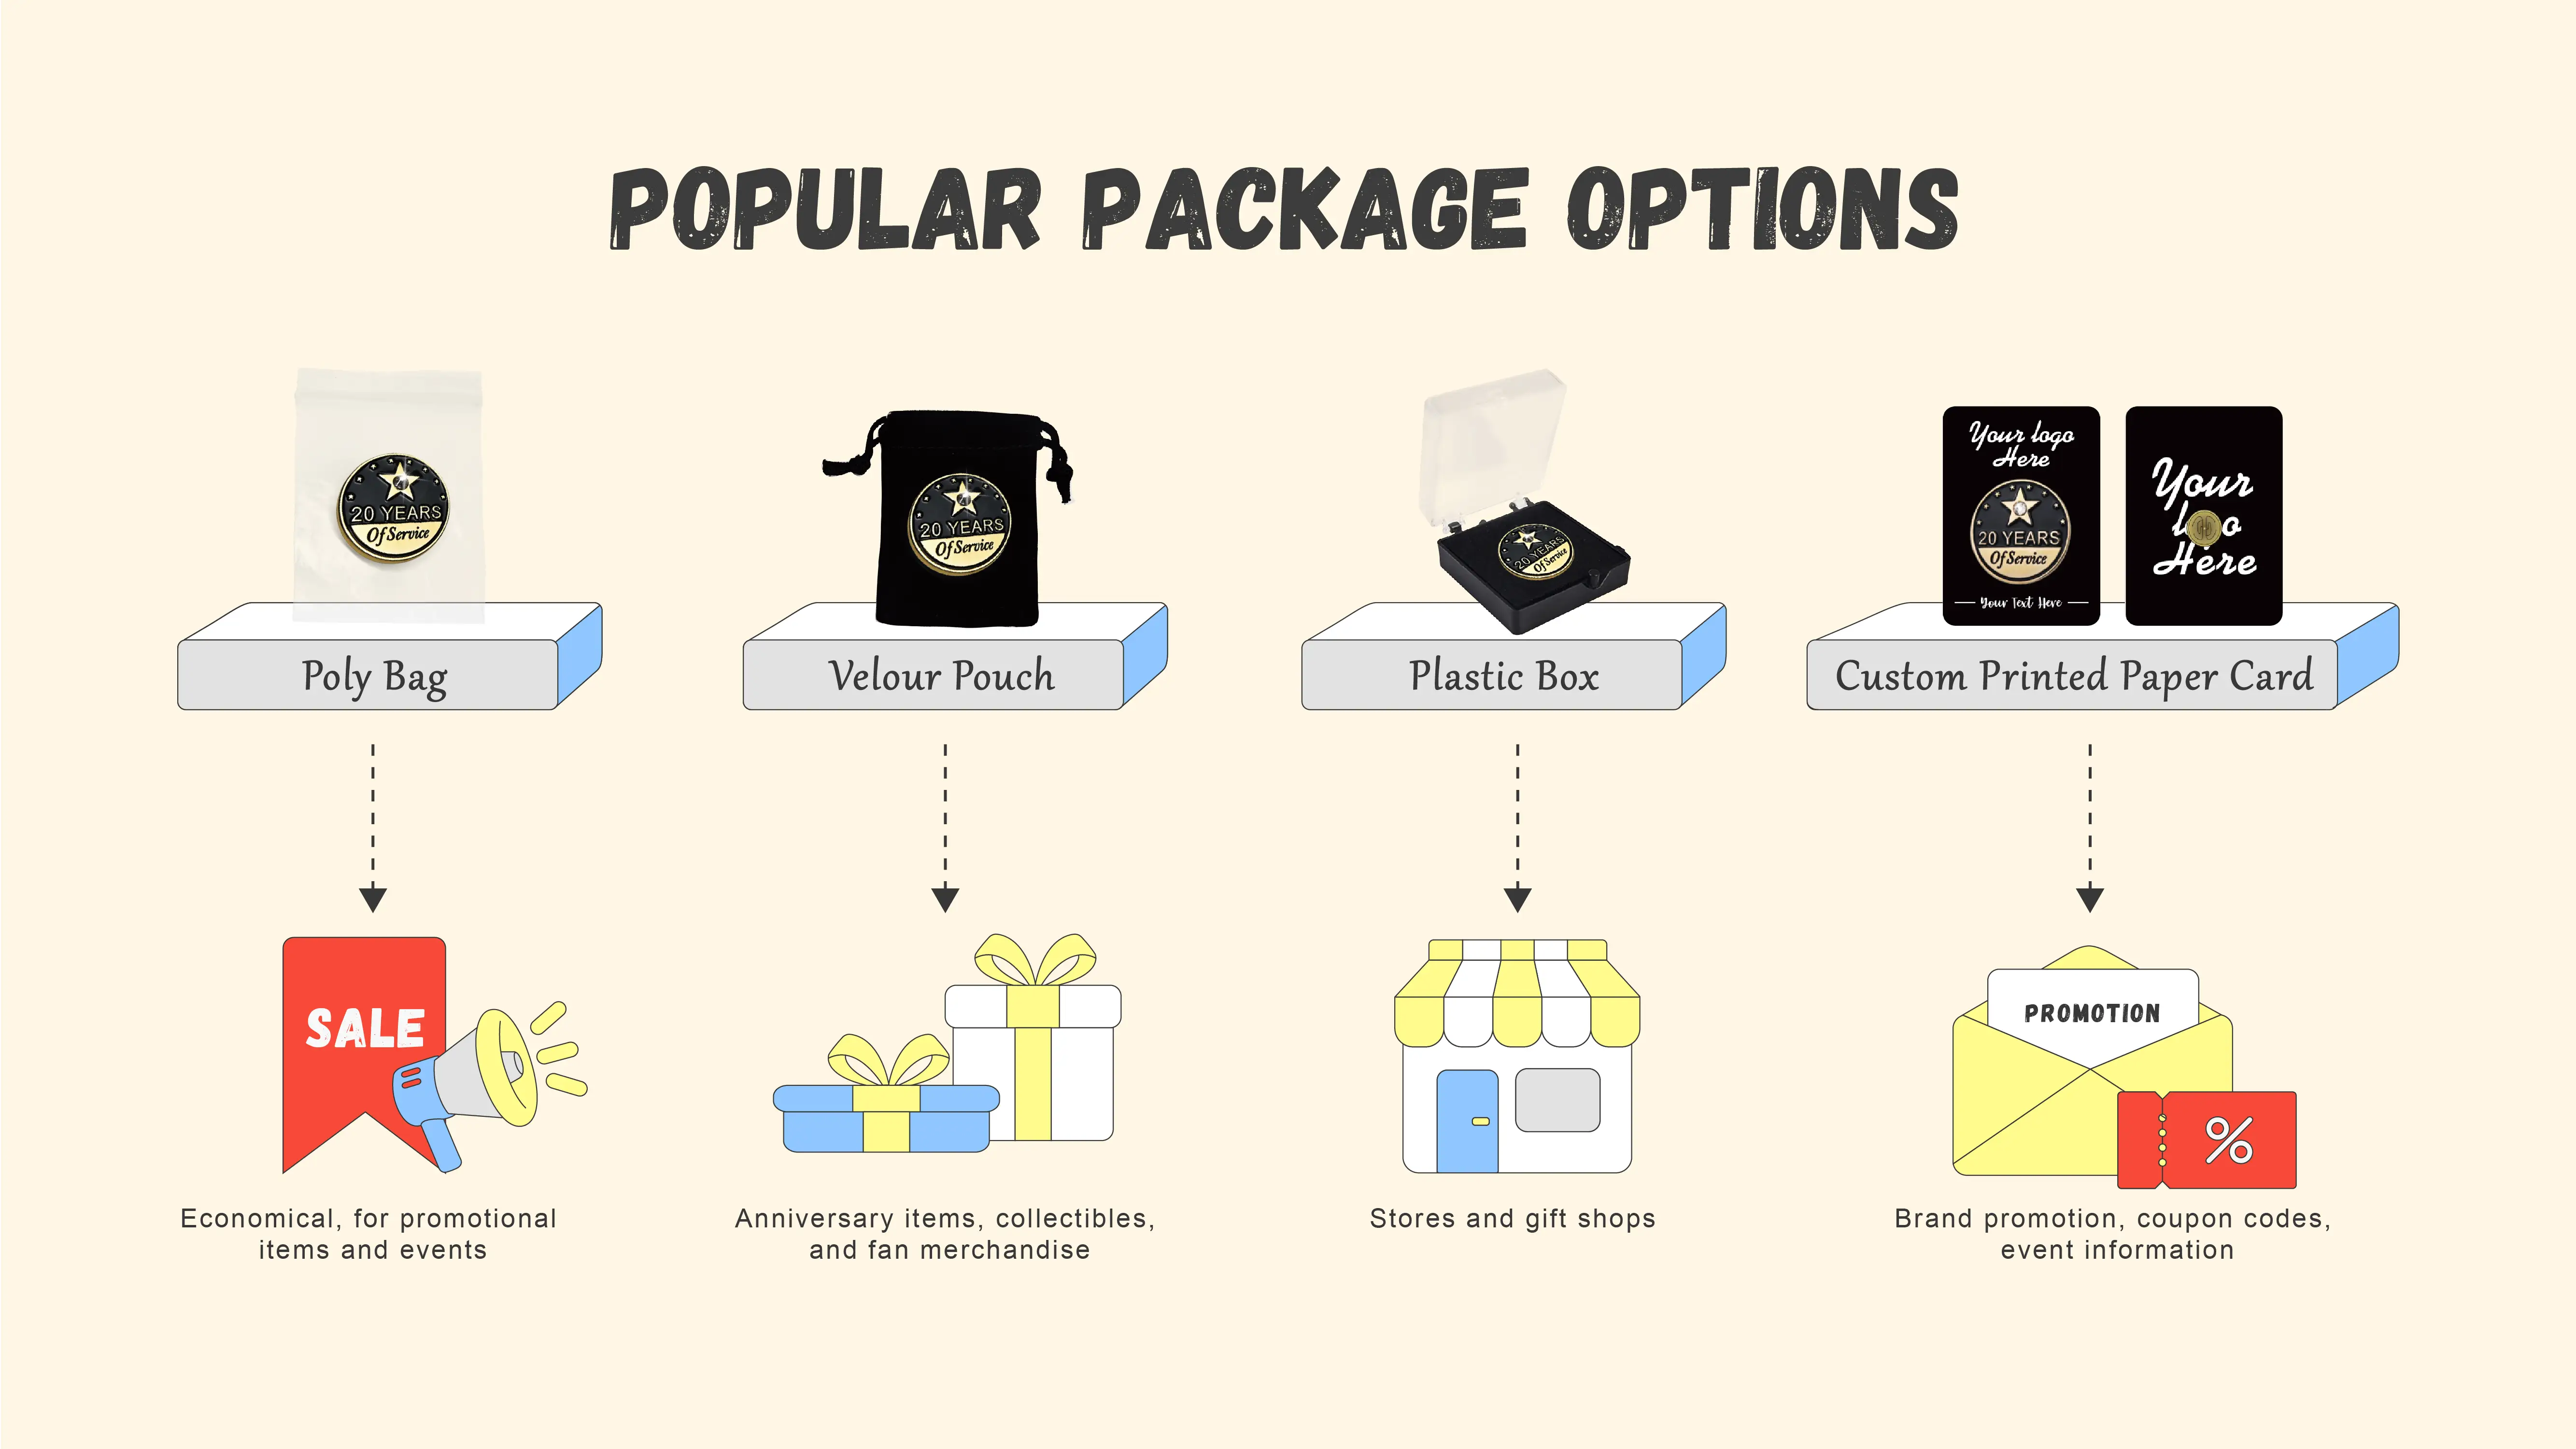
Pin manufacturers often provide free plastic bags, which are ideal for large-volume custom pins.
However, plastic bags are not suitable for pins intended for sale in stores, collections, or prizes. Therefore, pin manufacturers offer a variety of upgraded packaging options.
Premium packaging can enhance the visual impact of the entire pin, but if you don't have any special requirements for packaging, the free polybag is the best choice.
For a more detailed, comprehensive guide to lapel pin packaging, you can visit: Custom Lapel Pin Packaging Guide.
Step 7- Order Check
Ordering custom pins does not have to be a stressful guessing game against the calendar. If you take it step by step instead of rushing at the last minute, you can easily protect your budget and hit your event date without the panic.
Before you click submit, just walk through these four quick steps:
- Check your artwork: Make sure your logo has clean lines and separate color sections so our factory team can read the file perfectly.
- Review your proof: Look closely at your free digital blueprint to double-check the spelling, text placement, and metal borders.
- Pick your material: Match your design to the right style, balancing budget-friendly options against premium, heavy finishes.
- Lock in your date: Count backward from your event and select the right shipping speed to completely avoid high rush fees.
Step 8- Calculate the Cost and Place Your Order
1. The Mold Fee Amortization Trap
When ordering a small batch of pins, your biggest financial hurdle is not the cost of the metal or paint. It is the setup cost. Traditional physical pins require a custom steel die-struck mold to stamp your design into metal. If a factory charges a fixed $60 mold fee, that upfront cost behaves very differently depending on your order size:On a bulk run of 1,000 pins, that mold fee adds a tiny $0.06 to the price of each pin.
On a small run of 50 pins, that exact same fee adds $1.20 to every single pin before manufacturing even begins.
To bypass this steep trap, digital printing on pre-stamped brass bases is the smartest alternative. Because the factory prints your full-color design directly onto a pre-made metal blank, there is no custom mold charge. For a small batch, that difference alone can cut your upfront costs significantly.
● Real-Time Pricing Decisions
To see how these costs shift based on your design choices, you can use the GS-JJ custom pin design tool. It updates your price in real time as you adjust quantity, style, and size. You can also compare configurations side by side to find the sweet spot between a premium look and your budget.
When your order volume exceeds 100 to 500 pieces, the manufacturing mold's fixed cost is fully amortized. This drops your per-unit costs by up to 70% and makes premium upgrades highly cost-effective for your business.
2.The Break-Even Inflection Points
When you order custom pins, the factory operates on a steep sliding scale. The absolute biggest price drop happens right when you move past the small sample batch phase and hit actual wholesale production numbers.
To understand the cost-effectiveness associated with different order sizes, please view our comprehensive pricing guide: The Ultimate Custom Lapel Pins Pricing Guide.
II. Making custom enamel pins FAQ
① Could you advise me top 3 enamel pin makers?
We offer three top-rated Enamel pin manufacturers, focusing on quality, price, service, and delivery.
● Vivipins: High-quality products, eco-friendly production processes, and fast delivery.
● GS-JJ: With over 20 years of manufacturing experience, offers free design services, no minimum order quantity, rush service and fast production and shipping.
● PinMart: Extensive production experience, a variety of customization options, and superior product quality.
② Can I make backing cards for my enamel pins?
Yes, you can display your pins through the backing card to help you better promote your brand. Many manufacturers offer this service, or you can use a business card company like Vistaprint to provide this service.
③ How much does it cost to make an enamel pin?
Many factors influence the price, primarily quantity and design. The more customized the quantity, the lower the price of the product. The price of a pin ranges from US$1 to US$5.
III. Conclusion
The above guide gives you a comprehensive introduction to the pin production process and helps you solve the problems that arise when customizing pins. Making pins is an interesting process. As long as you have any ideas, join us and create more unique pin works together.